.jpg) Here is a little something that I whipped up for a little friend of mine named Daylan. She is having a runway birthday party. Soooooo I thought of a "fashion boutique" I made her some business cards with a little felt card holder and a sign for her door which reads "Daylan's Fashion Boutique" I've also made a birthday bunting with her name on it. She told me her colors for her party were orange & baby blue! Very hip!
Here is a little something that I whipped up for a little friend of mine named Daylan. She is having a runway birthday party. Soooooo I thought of a "fashion boutique" I made her some business cards with a little felt card holder and a sign for her door which reads "Daylan's Fashion Boutique" I've also made a birthday bunting with her name on it. She told me her colors for her party were orange & baby blue! Very hip!
Just for fun~
Friday, February 29, 2008 0 commentsHere is a little something that I whipped up for a little friend of mine named Daylan. She is having a runway birthday party. Soooooo I thought of a "fashion boutique" I made her some business cards with a little felt card holder and a sign for her door which reads "Daylan's Fashion Boutique" I've also made a birthday bunting with her name on it. She told me her colors for her party were orange & baby blue! Very hip!
Show & Tell Friday
0 comments This week for show & tell I'm showing & tellin' about some Map table cloths I've made for... yes, you guessed it, my grandson's pirate party! (coming in APRIL)
 .jpg) Now this is just the top part mind you.... I've made 3 of these map table cloths that will be atop of...I'm thinking some black fabric, or maybe some burlap? I'm not sure yet~ This one pictured has a map from my house to my grandson's house! He is my little treasure, thats for sure!!
Now this is just the top part mind you.... I've made 3 of these map table cloths that will be atop of...I'm thinking some black fabric, or maybe some burlap? I'm not sure yet~ This one pictured has a map from my house to my grandson's house! He is my little treasure, thats for sure!!.jpg) Here is a close up of the compass I've stenciled on one corner.
Here is a close up of the compass I've stenciled on one corner.Here is how I made them if anyone is interested:
I took some ultra suede fabric and tore the edges randomly. I then went around the edge with some watered down paints. I then took the fabric outside and ever so lightly sprayed it with some spray paint in the colors of black and a red primer. I then bunched up the fabric and sprayed it a little darker to give it the look of being folded up for ages. I found and enlarged a map compass online and printed it onto cardstock paper which I then cut out and made into a stencil. I used acrylic paints to stencil on the fabric. I then just painted roughly a "map" onto this old-worn looking fabric. I'm pretty happy with the results!
The winner in my drawing for one of my zipper pins is: Susan from the blog Penless Writer. Susan if you could e-mail me your address I'll get your pin off to you toots-sweet!
This show & tell is hosted by Kelli :-)
Theme Thursday~
Thursday, February 28, 2008 0 comments
This week's theme: Letters of the alphabet... all or some~.jpg) I created a little box with my ol' pal Pete. His impish-mischievous look always cracks me up. Here Pete is sitting on some old wooden blocks... A, B & C of course. I used some pages from an old school book from the late 1800's to cover the top/bottom & sides. I also used some vintage gold (fading in some spots) crepe paper...I love that stuff~
I created a little box with my ol' pal Pete. His impish-mischievous look always cracks me up. Here Pete is sitting on some old wooden blocks... A, B & C of course. I used some pages from an old school book from the late 1800's to cover the top/bottom & sides. I also used some vintage gold (fading in some spots) crepe paper...I love that stuff~
I still cannot get my photos to enlarge when clicked upon.... any words of advice on what to do or try? Thanks in advance :-)
I created a little box with my ol' pal Pete. His impish-mischievous look always cracks me up. Here Pete is sitting on some old wooden blocks... A, B & C of course. I used some pages from an old school book from the late 1800's to cover the top/bottom & sides. I also used some vintage gold (fading in some spots) crepe paper...I love that stuff~I still cannot get my photos to enlarge when clicked upon.... any words of advice on what to do or try? Thanks in advance :-)
Mixed Media Monday
Monday, February 25, 2008 0 comments
This week's theme: School .jpg) I didn't add any embellishments of color or anything that would detract from the photo... I've used this photo sooooooooo many times that this time, I just wanted the kids and the simplicity of that. How many times can you "pink the cheeks" and think its cute? lol I was thinking maybe adding an old pencil.... like a handle at the top. I just need to set it aside and see what pops up.
I didn't add any embellishments of color or anything that would detract from the photo... I've used this photo sooooooooo many times that this time, I just wanted the kids and the simplicity of that. How many times can you "pink the cheeks" and think its cute? lol I was thinking maybe adding an old pencil.... like a handle at the top. I just need to set it aside and see what pops up. .jpg) I used an old family photo from the year 1925. I color copied the image (a lot smaller, the original is 8 x 10) and ever so carefully cut out each row of children. I then, ever so carefully, glued them back together on top of another copy of the same exact photo. I glued small bits of black paper behind each child so that they will always appear to be "popping" out of the photo. I then surrounded the photo with raised edges, placed a glass top over that and then soldered the whole thing. (soldering is a lot harder than most people express! lol)
I used an old family photo from the year 1925. I color copied the image (a lot smaller, the original is 8 x 10) and ever so carefully cut out each row of children. I then, ever so carefully, glued them back together on top of another copy of the same exact photo. I glued small bits of black paper behind each child so that they will always appear to be "popping" out of the photo. I then surrounded the photo with raised edges, placed a glass top over that and then soldered the whole thing. (soldering is a lot harder than most people express! lol)
I love the whole concept of the photo under glass, and I'm thinking I am going to do this more often as it was/is fun~ Maybe my soldering will improve! lol
I didn't add any embellishments of color or anything that would detract from the photo... I've used this photo sooooooooo many times that this time, I just wanted the kids and the simplicity of that. How many times can you "pink the cheeks" and think its cute? lol I was thinking maybe adding an old pencil.... like a handle at the top. I just need to set it aside and see what pops up. I used an old family photo from the year 1925. I color copied the image (a lot smaller, the original is 8 x 10) and ever so carefully cut out each row of children. I then, ever so carefully, glued them back together on top of another copy of the same exact photo. I glued small bits of black paper behind each child so that they will always appear to be "popping" out of the photo. I then surrounded the photo with raised edges, placed a glass top over that and then soldered the whole thing. (soldering is a lot harder than most people express! lol)I love the whole concept of the photo under glass, and I'm thinking I am going to do this more often as it was/is fun~ Maybe my soldering will improve! lol
Show & Tell Friday~
Friday, February 22, 2008 0 comments
Showin' & tellin' & givin' something away~
This week.... I'm sharing a torso/jewelry stand that I purchased from a second hand store for 2 buckeroos. The bust is made out of styrofoam and is held up by a brass stand. I covered the bust with vintage sheet music. I've had this jewelry stand for years. It was in my daughter's room when she was a teenager, it had leopard fabric on it when she had it. She hung necklaces from it and even used it as a bulletin board, it was cute! When she got married & moved out I had it in a hall closet for a few years lol.... and now its going in my studio~.jpg) If your wanting to try covering something in old sheet music...here is how I did it:
If your wanting to try covering something in old sheet music...here is how I did it:
If your wanting to try covering something in old sheet music...here is how I did it:There is a trick to covering things with old sheet music or paper from old books. If you have ever tried to tear old paper into random strips you'll find they will tear very straight. Not a good look when your looking for a more hap-harzard look. Soooooooo if you soak the paper in hot water before tearing it apart it will tear beautifully and actually adhere faster with whatever glueing method your using. I just rubbed Elmers glue all over the torso with my hands, full strength letting the water on the paper dilute it ever so slightly. I let the piece dry over night. I then went over any rough bits with 100 grit sand paper (ever so lightly) I then went over the entire bust with a product called "Decoupage Finish" made by Royal Coat.... oh my goodness, I just love that stuff. It gives it a nice slight-gloss-yellowed-antique look when it dries!! It only takes about 20 minutes to dry. I highly recommend this product. Anywho... once the finish coat was dry, I sanded anymore spots that seemed a tad rough and just applied another coat of the decoupage finish over those bits and taaaaaaaaaaaa daaaaaaaaaa instant cute!!
Another thing I want to share this Friday is this:
.jpg) A flower pin made out of a vintage zipper. Now mind you, this is my very first one~ so it is not 100% fabulous, just about 80% fabulous~ I am having a "give-away" to anyone wanting a chance to win a zipper flower pin (not this one, hopefully a cuter one!) I know not everyone thinks this is cute nor would want it....so if you want a chance, just say you want in the drawing and I'll enter you! I will draw out a name and post it in next Friday's show & tell!
A flower pin made out of a vintage zipper. Now mind you, this is my very first one~ so it is not 100% fabulous, just about 80% fabulous~ I am having a "give-away" to anyone wanting a chance to win a zipper flower pin (not this one, hopefully a cuter one!) I know not everyone thinks this is cute nor would want it....so if you want a chance, just say you want in the drawing and I'll enter you! I will draw out a name and post it in next Friday's show & tell! This show & tell is hosted by Kelli
I WON~
Monday, February 18, 2008 0 comments
I never win 'nuffin.... and I won two things :-) Firstly I won this.... beautiful art piece from Patty O'Rourke It is from the One World One Heart blogwide event I took part in. Isn't it beautiful! Thank you sooooooooooo much Patty, I can't wait to receive it!!
Firstly I won this.... beautiful art piece from Patty O'Rourke It is from the One World One Heart blogwide event I took part in. Isn't it beautiful! Thank you sooooooooooo much Patty, I can't wait to receive it!!Secondly, I won this from Betty: 
I just love it! Thank you soooooooooo much Betty!
Mixed Media Monday~
0 comments
This weeks theme: Texture
Ok....... Finally finished it, here it is in all its glittered glory~ Behind the gal in the pink dress is the glittered word "Wish"

 I created this piece using an old wooden gold frame as the base. I created a shadow-box effect by backing the piece with a piece of foam core. I then went around the edge with pleated gold crepe paper to hide the joint between the frame & the foam core. I used a china torso & legs with which I've created "a dress that flows like music" lol (Her dress is created using vintage sheet music) I first wet the paper with water, then hot glued it to the dress form (which was chicken wire) I then painted a wash of pink over that.... then I highlighted the dress with some chunky pink glitter. I even gave her a matching head piece~ She is standing in front of gold glittered chicken wire, gold glittered leaves, gold glittered berries... and a little bird nest which houses a silver glittered bird~
Ok....... Finally finished it, here it is in all its glittered glory~ Behind the gal in the pink dress is the glittered word "Wish"
I created this piece using an old wooden gold frame as the base. I created a shadow-box effect by backing the piece with a piece of foam core. I then went around the edge with pleated gold crepe paper to hide the joint between the frame & the foam core. I used a china torso & legs with which I've created "a dress that flows like music" lol (Her dress is created using vintage sheet music) I first wet the paper with water, then hot glued it to the dress form (which was chicken wire) I then painted a wash of pink over that.... then I highlighted the dress with some chunky pink glitter. I even gave her a matching head piece~ She is standing in front of gold glittered chicken wire, gold glittered leaves, gold glittered berries... and a little bird nest which houses a silver glittered bird~ Doorways~
Friday, February 15, 2008 0 comments
This weeks theme was "Doorways" I made my "door" out of a paint brush. Expressing yourself though art can open doors... as in... the joy you feel, the release of emotions.... ummmm.... just the belief that what you do makes a statement if to no one else but yourself. Now with that said... don't look to closely at this piece or you'll know for sure I'm needing therapy LOL~
*note, some of the glue & paint is still wet*
Here is the door closed.... Look at the paint brush "key" above the door, neato huh~.jpg) The door opening up.....
The door opening up......jpg) Looking though the door you will see a silver charm that reads "courage"
Looking though the door you will see a silver charm that reads "courage".jpg) I am such a coward when it comes to art... but I'm getting better!
I am such a coward when it comes to art... but I'm getting better!
The door opening up.....Looking though the door you will see a silver charm that reads "courage" I am such a coward when it comes to art... but I'm getting better!Show & Tell Friday~
0 comments This week I'm sharing a little treasure chest I've painted for my grandson's Pirate birthday party in April.
.jpg) I purchased the chest from a second hand store and painted it just as it was to keep it looking old and battered. I lined the inside of the chest with some map wall paper.
I purchased the chest from a second hand store and painted it just as it was to keep it looking old and battered. I lined the inside of the chest with some map wall paper. .jpg) I've also made a wall sign with my grandson's name.
I've also made a wall sign with my grandson's name. .jpg) I purchased some wooden letters and covered them with some maps I got for free from another second hand store. (Don't you just love second hand stores?) Anywho, I used water solvable ink around the edges of each letter then I used something called decoupage finish on top of that...and that caused the ink to wash over the map causing the bright/vibrant colors to become aged. I drilled holes into each letter and added knotted suede roving to make it appear that it was tied onto the large oval... but I just glued them on. (I used the same technique on the ovals map) I then glued rope around the edge added some suede roving, made a hanger and taaaaaaadaaaaaaa, instant cute!
I purchased some wooden letters and covered them with some maps I got for free from another second hand store. (Don't you just love second hand stores?) Anywho, I used water solvable ink around the edges of each letter then I used something called decoupage finish on top of that...and that caused the ink to wash over the map causing the bright/vibrant colors to become aged. I drilled holes into each letter and added knotted suede roving to make it appear that it was tied onto the large oval... but I just glued them on. (I used the same technique on the ovals map) I then glued rope around the edge added some suede roving, made a hanger and taaaaaaadaaaaaaa, instant cute!This Show & Tell is hosted by: Kelli

1 World 1 Heart Winner
0 commentsI had 160 people enter my giveaway for the 1 World 1 Heart 2nd annual blogwide giveaway and the winner is: Michele from Calico Daisy Here is a photo of what it is I'm sending to her~.jpg) This is Pete....sitting and waiting for you to "pay him no mind" so he can sprinkle that handful of weed seeds he is holding all around your garden, the little stinker~
This is Pete....sitting and waiting for you to "pay him no mind" so he can sprinkle that handful of weed seeds he is holding all around your garden, the little stinker~
This is Pete....sitting and waiting for you to "pay him no mind" so he can sprinkle that handful of weed seeds he is holding all around your garden, the little stinker~ Themed Thursday
0 comments.jpg) This Thursday's theme is "By the Sea"....now how funny are the faces of these two boys wearing matching sailor outfits? I sandwiched chipboard between the same paper front & back and went around the edge with green & gold embossing to fill in the crack...super cute! Before gluing it all together I pleated some pistacio colored crepe paper at the bottom of the tag and added some black lace.
This Thursday's theme is "By the Sea"....now how funny are the faces of these two boys wearing matching sailor outfits? I sandwiched chipboard between the same paper front & back and went around the edge with green & gold embossing to fill in the crack...super cute! Before gluing it all together I pleated some pistacio colored crepe paper at the bottom of the tag and added some black lace.I added the caption... "There is a reason why somethings are buy one get one free..." I don't know about you...but that cracked me up :-P
.jpg)
Wednesday Stamper
Wednesday, February 13, 2008 0 comments
Okie-dokie my first piece for "Wednesday Stamper" The theme is: Valentine. The piece reads: "You Stole My Heart, You Little Pirate" this is for my grandson's very first Valentines day. (I call him a pirate~).jpg) I created the look of old leather using a brown craft paper that I crinkled then painted on a watered down dark brown... loads of water! I made a skull & cross bones using old maps which I aged. I went over everything with a coat of glossy finish.... I just love that stuff! It really brings out everything and makes it pop. I added ruby red rhinestones as the eyes. Now.... where is the stamps you ask? Hmmmmm well, I took creative license (ya, thats it...) and I just used the stamp pad!!! All the black was created using the stamp pad at an angle.
I created the look of old leather using a brown craft paper that I crinkled then painted on a watered down dark brown... loads of water! I made a skull & cross bones using old maps which I aged. I went over everything with a coat of glossy finish.... I just love that stuff! It really brings out everything and makes it pop. I added ruby red rhinestones as the eyes. Now.... where is the stamps you ask? Hmmmmm well, I took creative license (ya, thats it...) and I just used the stamp pad!!! All the black was created using the stamp pad at an angle. .jpg) I did make a gift tag as well.... for this piece I DID use a stamp which I then embossed. I again used a piece of a map, aged it a tad...added his name, and then some embossing around the edge. Washed some gloss fixative over the top of all that. The two leather looking pieces (paper) are what I stamped & embossed :-)
I did make a gift tag as well.... for this piece I DID use a stamp which I then embossed. I again used a piece of a map, aged it a tad...added his name, and then some embossing around the edge. Washed some gloss fixative over the top of all that. The two leather looking pieces (paper) are what I stamped & embossed :-)
At an estate sale I got two large boxes filled with embossing powders & the ink as well *insert huge grin here* Sooooooo I purchased a heat gun a few months ago and just today got around to playing with it... I LOVE TO EMBOSS!!! Soooooooo easy/fun/exciting :-)
I created the look of old leather using a brown craft paper that I crinkled then painted on a watered down dark brown... loads of water! I made a skull & cross bones using old maps which I aged. I went over everything with a coat of glossy finish.... I just love that stuff! It really brings out everything and makes it pop. I added ruby red rhinestones as the eyes. Now.... where is the stamps you ask? Hmmmmm well, I took creative license (ya, thats it...) and I just used the stamp pad!!! All the black was created using the stamp pad at an angle. I did make a gift tag as well.... for this piece I DID use a stamp which I then embossed. I again used a piece of a map, aged it a tad...added his name, and then some embossing around the edge. Washed some gloss fixative over the top of all that. The two leather looking pieces (paper) are what I stamped & embossed :-)At an estate sale I got two large boxes filled with embossing powders & the ink as well *insert huge grin here* Sooooooo I purchased a heat gun a few months ago and just today got around to playing with it... I LOVE TO EMBOSS!!! Soooooooo easy/fun/exciting :-)
Tuesday's challenge~
Tuesday, February 12, 2008 0 comments
Well here is a challenge for a Tuesday.... the theme is "Houses" using a template given from the site.  The little verse reads: You will do foolish things, but do them with enthusiasm~
I've used stamps, a silver spoon with glittered sugar, a vintage rose along with some vintage plastic daisies.... some old plastic do-dads popped off of a tissue box....I've gone around the edge with copper tape (fun stuff!) a silver frame which holds a not-so-happy photo of me wearing a party hat with a white bird sittting on top~
The little verse reads: You will do foolish things, but do them with enthusiasm~I've used stamps, a silver spoon with glittered sugar, a vintage rose along with some vintage plastic daisies.... some old plastic do-dads popped off of a tissue box....I've gone around the edge with copper tape (fun stuff!) a silver frame which holds a not-so-happy photo of me wearing a party hat with a white bird sittting on top~
Mixed media~
Monday, February 11, 2008 0 comments
Here is a mixed media piece under the theme of "romance & love".jpg) I used part of a class photo from the early 1900's. I used a xeroxed copy which I then put some paint onto the dresses & the girls cheeks. Look at all the sour puss faces on the girls.... except for the one girl next to the only boy. It just cracks me up! I glued the pieces onto a small dollar store chalk-board.... and since I like things "shiney" (I have no idea why) I sprayed it with a gloss spray. Well, that made the chalk marks disappear *sigh* so I got some white paint and one of my "forgot to wash it off paint brushes" and painted on the look of chalk . I sanded the surface slightly so it looks like its been slid in and out from under stacks of books for years. (The jute pictured at the top of the chalk-board is for hanging the piece) I think it turned out kinda cute~
I used part of a class photo from the early 1900's. I used a xeroxed copy which I then put some paint onto the dresses & the girls cheeks. Look at all the sour puss faces on the girls.... except for the one girl next to the only boy. It just cracks me up! I glued the pieces onto a small dollar store chalk-board.... and since I like things "shiney" (I have no idea why) I sprayed it with a gloss spray. Well, that made the chalk marks disappear *sigh* so I got some white paint and one of my "forgot to wash it off paint brushes" and painted on the look of chalk . I sanded the surface slightly so it looks like its been slid in and out from under stacks of books for years. (The jute pictured at the top of the chalk-board is for hanging the piece) I think it turned out kinda cute~
I used part of a class photo from the early 1900's. I used a xeroxed copy which I then put some paint onto the dresses & the girls cheeks. Look at all the sour puss faces on the girls.... except for the one girl next to the only boy. It just cracks me up! I glued the pieces onto a small dollar store chalk-board.... and since I like things "shiney" (I have no idea why) I sprayed it with a gloss spray. Well, that made the chalk marks disappear *sigh* so I got some white paint and one of my "forgot to wash it off paint brushes" and painted on the look of chalk . I sanded the surface slightly so it looks like its been slid in and out from under stacks of books for years. (The jute pictured at the top of the chalk-board is for hanging the piece) I think it turned out kinda cute~
Gothic Arch
Sunday, February 10, 2008 0 comments
Here is a Gothic arch I made under the theme "Valentine" (The arch is 3 dimensional) The little cupid is holding a bow and has a quiver with gold glitter tiped arrows. I chose to paint the arch to look like a stone sooted arch...something like you'd see in Europe. I then made a little stand for the arch to sit on.... I like to assemble :-P
4 x 4 Friday
Friday, February 8, 2008 0 comments
This is my first "4 x 4 Friday"
The theme for this Friday is "The Wild West" ........ well it doesn't get any wilder than two boys acting like cowboys!.jpg) I used a dark brown & gold acrylic paint as the back drop for this 4 x 4. The photo is a copy of a vintage family photo. I stamped into the wet paint... let it dry, then I stamped the words "giddy up" again over the top of that using black acrylic paint. I painted on some varnish over the top.... I love that stuff. I'm thinking I am going to sand it a little bit (later) to hide the brush strokes. I think the combination of colors and the varnish it gives it an old looking patina.... I also added the little cracker jack pistol as a dangly.
I used a dark brown & gold acrylic paint as the back drop for this 4 x 4. The photo is a copy of a vintage family photo. I stamped into the wet paint... let it dry, then I stamped the words "giddy up" again over the top of that using black acrylic paint. I painted on some varnish over the top.... I love that stuff. I'm thinking I am going to sand it a little bit (later) to hide the brush strokes. I think the combination of colors and the varnish it gives it an old looking patina.... I also added the little cracker jack pistol as a dangly.
The theme for this Friday is "The Wild West" ........ well it doesn't get any wilder than two boys acting like cowboys!
I used a dark brown & gold acrylic paint as the back drop for this 4 x 4. The photo is a copy of a vintage family photo. I stamped into the wet paint... let it dry, then I stamped the words "giddy up" again over the top of that using black acrylic paint. I painted on some varnish over the top.... I love that stuff. I'm thinking I am going to sand it a little bit (later) to hide the brush strokes. I think the combination of colors and the varnish it gives it an old looking patina.... I also added the little cracker jack pistol as a dangly.
Theme Thursday: Spring~ (show & tell under this post)
Thursday, February 7, 2008 0 comments.jpg)
Here is a little 4x4 that I created under the theme of "Spring" for the blog site called Theme Thursday (click on photo to enlarge)
Show & Tell Friday~
0 comments
This week for show & tell I'm showing off something I purchased at a second hand store for $3 buckeroooooooooooooos~ *insert smile here* This is why I call second hand stores "boutiques" because you get such unusual/beautiful things there! Well, I do anyway!
This beautiful work of art is a handmade cut-out of the Hail Mary prayer. At first glance from across the store I was drawn to it because it looked "lacey" and I loved the old frame it was in as well.
 When I spotted it the old frame it was glued to was HUGE and gold.... soooo I cut the frame (mitered the corners) and made it smaller so the piece fit inside it better. The piece was also not painted.... you see, this piece of art is actually cut out of WOOD. Yes, tis true! It is made out of 3/16th inch wood. So I sprayed it white (my friend said once that if anyone sits to long at my house, they get sprayed white lol...)
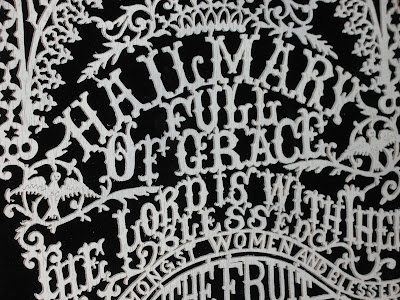 Here is a close up of the beautiful cut work....remember this is super thin wood. What a work of art huh?Anywho, I placed it atop of some black velvet and since there is no glass to this old frame, and I wanted to keep the dust off of it, I purchased some heavy plastic and just layed it over the top and glued it to the back of the frame.
Not knowing the history behind it at all, I am pretty confident that the person who made this has passed onto his/her great rewards. Why else would they part with it? I could tell that it had been hanging on a wall for ages.... I just bet that someone didn't see, didn't "feel" the immense love of God that this piece brought the artist who made this. Well.... I'm lucky that I found it.
This show & tell is hosted by Kelli.
'been gluing~
Tuesday, February 5, 2008 0 comments
I've felt like I've gotten nothing accomplished lately-----when in actuality~ I've got a lot of projects "in stages"...I've finished some business cards. I cut out some typing text and glued it to some vintage gift cards and had that reproduced onto photo grade paper at the copy center...I love this look. Cut it out with my trusty paper cutter and taaaaa-daaaaaa instant cute cards!
 I've also finally finished these little boxes. The inside of the box has some french text glued inside. Oooooooo la-la~ The tops of the boxes have ballerina's on them. I've hidden the bases of the ballerina's so it appears they are standing "on point" atop the boxes! I've hand painted each one...glittered their outfits and gave them all a matching "ribbon" to swirl above their head as they dance. Such happy girls~
I've also finally finished these little boxes. The inside of the box has some french text glued inside. Oooooooo la-la~ The tops of the boxes have ballerina's on them. I've hidden the bases of the ballerina's so it appears they are standing "on point" atop the boxes! I've hand painted each one...glittered their outfits and gave them all a matching "ribbon" to swirl above their head as they dance. Such happy girls~
Manipulating Stripes #2
Sunday, February 3, 2008 0 comments
In the past,, we've shown you different ways that designers manipulate striped fabric to make a new pattern. Designers can use seams to great effect in changing the look of a striped fabric. At a quick glance, you might think this 1950's dress is fashioned from two co-ordinating fabrics. Not so. The designer has used a technique of wide tucks sewn between the stripes to give the fabric a completely different look.

As you can see, the floral stripe pattern is centered in a deep vertical tuck sewn between the stripes.

The tuck is spread so the line of stitching is centered behind the stripe pattern, then pressed flat. This pulls the stripes much closer together and adds texture to the bodice. Cute, don't you think?
See this dress and more at Couture Allure Vintage Fashion .
Subscribe to:
Comments (Atom)